AWS - Using s3 to deploy a Static website
Check our our Github page for html code and detailed walkthrough from start to finish
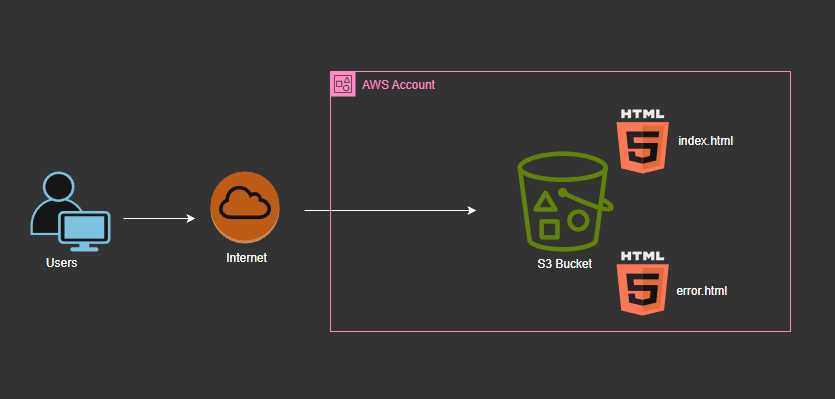
 How to deploy your static web site on AWS using s3 bucket
prerequisites
-
You need to have an AWS account. Click here to get your AWS free tier account for up to six (6) months.
-
No coding experience
- No previous IT knowledge
📢 Step 1
- Sign in to your AWS Account (Make sure you are not using the root account user for this exercise).
If you are new to AWS, I'll suggest you read this AWS documentation for more. Click here
-
On the Search bar on the top of the AWS Console page, search for
s3and click on the S3 bucket on theServicespanel. You might not have any s3 bucket create, if you do, that is even better. -
You will be automatically directed to the
General purpose bucketssection. Click onCreate bucket. -
The name of your s3 bucket has to be globally unique (No two AWS accounts should have the same s3 bucket name). I name mine
dcyberguy.local. It is advisable when creating a static website to name your bucket is this format,<<bucket>>-<<name>>.<<someRandomStuff>> -
Under
Block Public Access settings for this bucket. Uncheck theBlock all public accessand acknowledge at the bottom. This would make you s3 bucket access to the entire public (😧scary, right). We do have a s3 bucket that wwould only restrict the public to just "Read Access" -
Leave
Default encryptionas default. We would need some kind of encryption. -
Than finally, click
Create bucket
🔊 Step 2
-
Once the s3 bucket has been fully provisioned. Click on the newly created bucket name
-
Under the newly created bucket. You should options like
Object,Metadata,Properties,Permissionsand so on. Click onProperties. -
Under
Properties, scroll all the way down till you get toStatic website hosting. Click onEditto the far right andEnableStatic website hosting. -
Don't forget to
Save changes.
📯 Step 3
-
Go back to the
ObjectOptions at the top of your newly created s3 bucket. It's time to upload ourhtmlfiles. Fun times 🎶🎶🎶 -
On this Github repo under the you will have an
index.htmlanderror.htmlfiles. Save them to your local machine. -
Back to your s3 bucket, Under the
Objectoption, on the far right, clickUpload. Also to the far right of the Upload page, clickAdd files. Located theIndex.htmlfiles and upload it, then do the same with theerror.htmlfile. Remember to clickUploadon the bottom of the page when you finish. -
We are not done yet, last lap 🏃♂️
🔔 Step 4
-
Back at your newly created s3 bucket, Go to option
Permissionsat the top of the s3 bucket. -
Under
Bucket policy, click theeditbutton to the right and paste this belowjsonfile. It is also attached as part of this repo.
Mine would be something like this. Change the dcyberguy.local s3 bucket name to your s3 bucket name.
{
    "Version": "2012-10-17",
    "Statement": [
        {
            "Sid": "PublicReadGetObject",
            "Effect": "Allow",
            "Principal": "*",
            "Action": "s3:GetObject",
            "Resource": "arn:aws:s3:::dcyberguy.local/*" // Change this to your s3 ARN name
        }
    ]
}
The Effect is Allow
The Principal is *, that means basically everyone
The Action is s3:GetObject means only being to Read (GET)
The Resource is your S3 bucket
Go to your browser and goto YOUR-S3-BUCKET-NAME. Your Static website is LIVE 🔥